Bove the list you can use the POSITIONS filter to set whether all players or only players of the selected position group should be displayed.
This is very helpful because many players are proficient in multiple positions.
The players are listed grouped by goalkeeper, defense, midfield, and forward.
For all players, the most important information is visible at a glance:
Player name
Yellow / Red suspension including remaining duration of the suspension
Injury along with remaining period of suspension
Starting lineup / Friendly lineup
Nationality
Age
Position
Games (in the current season)
Goals (in current season)
Assists (in current season)
Market value
Grade average (in current season)
The small selection box in front of the player names can be used to mark players. If you set the toggle switch that appears above the list to „SELECT ONLY“, only previously selected players will be displayed and can be compared with each other.
In the last column you can choose via dropdown which properties should be displayed for all players in the list.
Each team may have a maximum of 30 players on their team. New additions that go übeyond the number of 30 are disabled and cannot be used. Only when the total number is 30 again, the players will be activated.
CAUTION: After the winter break and after the summer break, all recently added players who get over the number of 30 will be removed from the team. These players will be free agents and offered on the transfer market. The team manager receives no transfer fee or compensation.
But before that, the team manager gets a warning üvia the messenger.
A football player needs to train to improve his skills and to gain or maintain good fitness. The coach's job is to improve each player's individual skills. At the same time he has to find the right balance between intensive training and regenerative units to keep the fitness high. At the same time, fitness should not be confused with freshness or recovery. A player who does not train at all or with too little intensity will not get good fitness values.
Every team starts with a standard training plan. This general plan keeps the fitness of all players at a consistent level and does not carry a particularly high risk of injury. However, the individual skills of the players are not taken into account. The standard training plan is a good basis and can be adapted to your own ideas and the needs of the squad. To do this, however, a copy must be made, as the original standard training plan cannot be altered.
The weekly view shows all units for the current training week
To edit a day of the week, click on the (1) day of the week or on the
(2) Edit button of the day of the week. To edit an existing training session, it can be clicked directly (3).
(4) The Copy button creates a copy of the currently selected training plan.
The daily view shows all the sessions, broken down by training slot. To start, each team has one training spot, which is available on both sides separately. If a team has more than one training place, these are displayed accordingly and several training groups can train in parallel.
The following information is mapped to each training slot:
(1) Training group along with the number of players training.
(2) Training leader (coach, assistant coach, assistant coach, or goalie coach)
(3) Duration of the session. This can be adjusted via the slider (4).
To add a unit, i.e. a training slot, simply click on the „add“-space in the timeline of the desired training slot (5).
If there is a conflict with another training group, this is indicated üvia an icon (6). A conflict can occur when a player or a training leader participates in 2 üoverlapping training sessions. The exact cause is shown as an explanation text when hovering over or clicking on the symbol (7). Some areas on the timeline are locked and cannot be occupied (8).
To move a slot, it can be dragged & dropped and selected to be moved to another location.
To set a training slot in detail, click on a slot in the weekly schedule or on the edit icon in the daily schedule
In the training slot editor, the following settings can be made for the training session:
(1) Type of training
(2) Training direction. Usually the coach, i.e. the team manager himself, leads the training. But it can also be led by a co-trainer or assistant. Goalkeeper training can only be conducted by a goalkeeper coach.
(3) Basic information on the chosen training type and intensity. The intensity is crucial for the fitness of a player.
(4) Duration of the training session, adjustable in 15-minute increments. The maximum duration is limited by the total daily training duration of 3 hours.
(5) Training group. The players of the selected training group participate in the training session. You can choose from predefined system groups as well as from self-created groups.
(6) Via the filter can be set, which player property is displayed in the list.
(7) Via the checkbox individual players can be deactivated. These players will not take part in the training session. The training group remains unaffected, the deactivations are only valid for this slot.
(8) To edit the currently selected training group.
All changes are immediately applied and saved in real-time
Only when a new training slot is created will it be saved using the „Save“ button.
Multiple training plans can be created. The dropdown box (1) is used to set which training plan is displayed. The "+"-button (2) adds a new training plan. The "-"-button (3) deletes the currently selected training plan. The name can be changed in the name field (4). By clicking on the "A"-button (5) the current training plan is activated. This is additionally indicated by the "A"-symbol in the dropdown box (6). Only the active training plan is executed, manually or automatically.
(7) The Copy button creates a copy of the currently selected training plan.
For each training session, a training lead must be assigned. To run multiple sessions in parallel, you need additional staff.
Trainer
The team manager himself acts as a coach. The effect is higher for all types of training.
Co-Trainer
A co-trainer, just like the coach, can lead any session. However, the training effect of the co-trainer is slightly less for the following training sessions.
• Training Game
• Tactics
• Standard situations
Assistant
An assistant, just like the coach, can lead any session. However, the assistant's training effect is significantly lower for the following training sessions:
• Training game • Tactics
For the following units, the training effect is slightly lower: • Standard situations • Technique
Goalie coach.
The goalie coach can only lead the goalkeeper training.
Each training session is run by a group of players. This is called a training group.
There are fixed defined training groups, called system groups. These automatically always contain all matching players. Players who are new to a club are automatically in the appropriate system groups.
• All players
All field players and goalkeepers of the team
• All field players
All players, except the goalkeeper
• Goalkeeper
All goalkeepers of the team
• Defense
• Midfield
• Attack
The system groups cannot be edited and update automatically when a player leaves or joins the club.
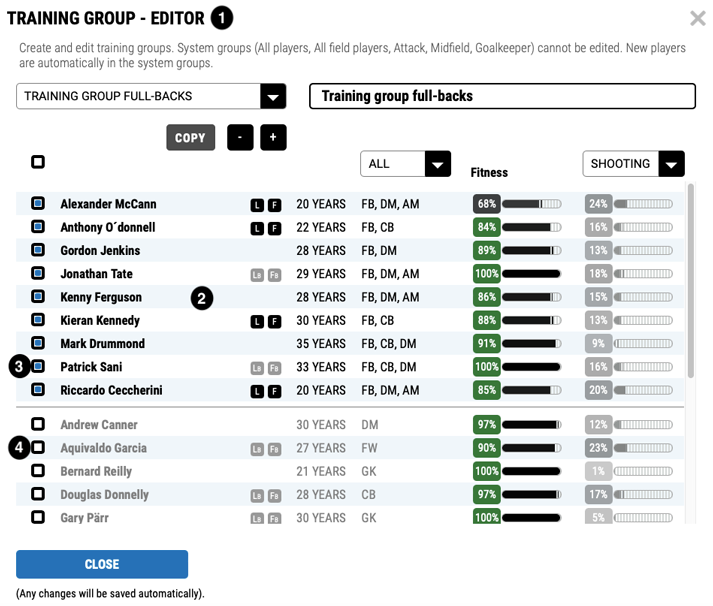
In the training group editor, training groups can be created, deleted and edited.
(1) Invoking the training group editor
(2) All selected players üabove the line are part of the training group.
(3) To add a player to the training group, click on the small selection box.
(4) To remove a player from the training group, deactivate the small checkbox.
Game shapes 1-1 to 4-4 • Low risk of injury • Tacklings (Strong) • Condition (Medium) • Athletics (Medium)
Goalkeeper only: • Foot, Game opening, Libero (Low)
Medium Intensity:
Training game • Medium risk of injury • Condition (Medium) • Tactics (Medium) • Battle (Medium) • Header (Low) • Technique (Low) • Preparer (Low) • Goal threat (Low)
Goalkeeper only: • Penalty (Medium) • Run Out (Medium) • Game opening (Medium) • Line (Medium) • Libero (Low) • Foot (Low)
Stabilization training • Athletics (High) • Conditioning (Low)
Goalkeeper training
Only possible with goalkeepers. Training leader must be a goalkeeper coach • Low risk of injury • Line (High) • Running Out (High) • Penalty (High) • Foot; (Medium) • Game opening (Low)
• Libero (Low)
Game shapes 5-5 to 10-10 • Low risk of injury • Tactics (Medium) • Technique (Low) • Battle (Low) • Condition (Low) • Athletics (Low)
Goalkeeper only: • Foot; (Medium) • Game opening (Low) • Libero (Low)
Shooting training • Low risk of injury • Shooting technique (High) • Shooting Power (Medium) • Shooting Chance (Low)
Goalkeeper only:
Libero, Foot, Game opening (Low)
Very low intensity:
Regeneration
Tactics training • Tactics Understanding (High)
Goalkeeper only: • Libero (Low) • Game opening (Low)
Important: Too many repetitions of the same type of training within a training week leads to stagnation of performance improvement for some types of training. 5 hours of tactics training do not have the 5-fold effect as 1 hour of tactics training. Conditioning training, on the other hand, can be carried out for longer without the effect breaking down.
Players in detail
Via the toggle button above the player list can be used to toggle whether the training schedule or the performance level of the players should be displayed.
Below the training schedule is the player list with the total training time per player. Here you can check how long and intensive each player is training (1).
The intensity (2) shows whether the load for the player is in the greatest range. Optimal are 3 bars. If the load is too high, 4 or even 5 bars are shown in red. Too low a load is indicated by 1 or 2 grey bars. If the load is too high or too low, this will result in a loss of fitness.
Per mouseover or by clicking on one of the slot colors, the total duration of the respective training type is displayed (3). The player's entire training schedule can übe opened via the triangle next to his name (4).
For each player you can see the current fitness (1), his form (2) and the average value of his skills, including development (3).
If the training for the current week has already been performed manually, all values refer to the current state, including the effects of the training performed. In addition, the changes to the state before the training are displayed:
The change in fitness in the positive or negative range. This allows you to see at a glance whether the training had a positive or negative effect on the player's fitness.
The player s current form based on training impressions. If the player has not trained at all or has trained too little, the form cannot be determined. This is represented by a ? symbol.
• Very poor form. The player can hardly call up his potential.
• Poor form. The player is unable to play up to his potential. • Normal form. The player calls on his existing potential.
• Good form. The player is playing better than his potential at times.
• Top form. The player is playing far üabove his actual capabilities.
By hovering or clicking on the icon, the explanation is shown in text form.
An average value is formed from the player properties (hardskills). This is displayed as an integer (4). In addition, the tenth values are displayed in the form of small squares. As soon as 10 ticks are reached, the average value increases by a whole percentage point. The changes are shown in green (positive) or red (negative), respectively, for the number and for the bars.
If a player property has been changed, this is represented by a green "+", or by a red "-". By hovering or clicking a dialog appears, which shows which property it is (5).
The player's details can be opened by clicking the triangle next to the player's name.
The left pane shows the fitness as a graph for the last 10 games (1). By hovering or clicking, the fitness value is displayed as a number.
The form of the last 10 games can be seen on the right side (2).
The player's characteristics can be seen at the bottom (3). Any changes that have occurred as a result of the last game and training are shown green (positive) (4) or red (negative) (5). Changes of the whole value (6) as well as of the tenth values (7) are displayed.
Once a property has reached all 10 small tiles (10 times a tenth), the property value is increased by 1%. In this example, there are still 2 squares (2 tenths) missing to get to 28%:
There are basically two ways to perform the training:
Automatic
. Training is automatically run right before the game day calculation.
Manually by team manager
Each team manager can manually run the training for his team at any time. To do this, he proceeds as follows:
• Select the current, activated training plan in the weekly view. • Execute the workout by clicking on the button „EXECUTE TRAINING WEEK“ above the workout plan.
Players' performance levels show the trait, fitness, and form values that were affected by league play. The player details graphs show the progression of fitness and form. So the team manager can see how much the fitness loss is for each player.
The team manager can manually run the training at any time of the day.
After executing the training, the team manager gets information üabout the fitness of his players based on the training results. With the help of the training impressions the shape of the players is also displayed. However, only if the player has completed a certain minimum workload.
When training, players can get injured and are marked accordingly.
When training, certain characteristics of players are affected. These are shown in the overview and in the detail of the players. Which characteristics are improved and to what extent depends on several factors: Training sessions, age, talent, fitness and form.
The team manager can use this information to adjust the lineup for the next game. He can: • react to form highs or lows • sparing players with poor fitness • respond to injured players.
The current form of each player is also displayed in the lineup editor for this purpose.
Before the next match calculation, training will be run on all teams that had not yet run training manually.
What exactly the training plan should look like is individual and depends primarily on which skills are to be improved. An elementary point is the fitness of a player. This should not deteriorate despite intensive units, or even gradually improve. Of course, this also depends on how much a player has spent in league play.
For a good fitness value the basic training plan and the following hints are a good basis:
A training week must always be considered holistically. The sequence and overall load within the training week must fit.
Good fitness is not achieved by just taking it easy on players, nor by training them intensively for too long. The mix of time off, recovery, functional training and intense sessions has to be right. The level of the player must be kept high without overloading him. The intensity indicator of each player is a good tool to adjust the load correctly. If it is in the high range (3 bars), the intensity is balanced for the player. If it is below this level, the intensity should be increased. If it is above that, the intensity is too high and should be lowered.
Intensive training:
Training types have different intensities (see TRAINING TYPES section), So half an hour of conditioning training is roughly equivalent to 2 hours of shot training. So if we talk about 1 hour of intensive training, this can also be achieved by 2 hours of less intensive training.
Basically, a distinction must be made between whether a player has played a league game or not. This is the case when a player has played at least 15 minutes of the match. Whereby the fitness loss of players with less playing time is usually very small.
The intensity is displayed for each player. All units of the player in the training week are evaluated and added up. The display should show 3 bars (sizes) if possible. This is important to achieve an increase in fitness. However, there are other factors that play a role:
For players who played in the league on Saturday, the following recommendations apply for good fitness:
One day off during the week.
No more than 2 hours of intense training per day.
About 5 hours of intense training per week
Sufficient recovery and some rest after league play
Some recovery after any intense training.
A warmup in the form of coordination exercises should precede an intense workout.
One training game per week, at once or in several sessions. (Approximately 1 hour total)
The peak of the load should be in the middle of the week. Shut down before the game. Tactics training, possibly standards, not a high load.
For players who did not play in the league on Saturday, the following recommendations apply.
One day off during the week.
No more than 2 hours of intense training per day.
About 6 hours of intense training per week.
Some recovery after each intense workout.
A warmup in the form of coordination exercises should precede an intense workout.
One training game per week, at once or in several sessions. (Approximately 1 hour total)
Players can get injured during training. Depending on the type of training, there is an increased risk of injury. The factors in detail:
Fitness
The lower the fitness, the higher the risk of injury. This applies for training and matches.
Duration / Intensity
An intense training session with a high load carries a higher risk of injury than a light training session. A long-lasting high load increases the risk additionally.
Injury risk of the training session.
Depending on the type of training session, the risk of injury increases or decreases. The following types of training involve a slight risk of injury:
Fast strength
Game shapes 1-1 to 4-4
Game shapes 5-5 to 10-10
Standard situations
Shooting training
Goalkeeper training
There is a slightly higher risk of injury with the following type of training: Training game
Age
As you get older, your risk of injury increases
Injury susceptibility of the player
Each player has an individual injury susceptibility. This changes over time with the frequency of his injuries and is also influenced by training. Types of training such as conditioning, recovery, coordination exercises, speed strength and stabilization training, among others, help to mitigate the risk of injury.
A player's fitness is an important factor. The higher the fitness, the better the player can call on his skills. A player with a speed of 60, for example, can only call up speed 40 in the game if he has poor fitness. Depending on the condition, the performance ability in the game decreases further.
Good fitness also promotes the positive development of player characteristics (hard skills)
Intense or insufficient training loads are also better absorbed and show only slight negative effects.
The latter is helpful, for example, to train certain hard skills intensively at certain points and also to accept some loss of fitness. Especially in the winter or summer break.
Tip: Players with poor fitness have a correspondingly higher fitness loss the longer they are on the pitch in a match. This loss of fitness can sometimes not be compensated even by a perfectly coordinated training. Such players should be replaced in good time or given a break now and then.
The short HowTo video shows how to use the lineup editor at ONLINELEAGUE.co.uk. In addition, there are tips and hints on how to set the lineup of his team.
Manage and set team lineups for league and friendly matches.
All changes are saved immediately and automatically!
On the playing field (1), all player positions can be seen along with their position names. The number shows the average value of the player's skills.
The roster (2) shows all players of the team, grouped by starting eleven, substitutes bench and Other players who are not currently in the squad. There can be a total of 18 players in the squad. 11 in the starting eleven and 7 on the substitutes bench.
To place a player, drag & drop it to the desired position. If the position is already occupied, the two swap positions.
If a player appears on the field in light gray, he is playing a position he has not learned. This can have a negative impact on his performance. If he plays several games with good performance on this position, he can learn it. The position will then be displayed additionally. A player can learn a maximum of 3 positions. If he already has 3 positions, no more can be added.
The team parts are marked über the hatched areas. To the right of each is the average value of the team part (3), and at the top is the overall average value of the team (4).
The average values always refer to all skills of the player and therefore only serve as a rough guide.
To be successful, every system needs players with very different skills at the corresponding positions. In every system there are key players who are particularly important. These should preferably be well manned.
Set a position in the position dropdown (1) to show only players who can play on it.
The properties dropdown (2) sets which property is displayed for each player.
To put a player on the bench, drag & drop the player onto the bench field (3).
To view details of a player, simply select that player.
Using the Select Box (4), players can be selected and then displayed exclusively using „Select Only“ (5). In this way, players can be compared in a targeted manner.
Click on the overview button (6) to display an overall overview of the player's skills.
This section is used to set all tactical guidelines, standards, changes and game actions. Thus, each team manager is able to react to certain situations in the game, individually and proactively. Please note that not all defaults can really be implemented effectively by the team. Factors such as player skills, system, opponent and score influence the implementation of the defaults and the further progress of the game.
The dropdown (1) lists all the tactics settings that have been created. The selected setting is displayed as a list. With the + and – buttons new settings can be added or removed (2). To give the setting a meaningful name, simply click in the text box and enter the name (3). Click on the L (4) to save the selected setting for league games. For the friendly games click the F (5). The marks L and F can also be seen in the dropdown selection of the settings (1).
An offside trap can effectively restrict the opponent's offensive actions. Provided the right system of play and tactically well-trained players, of course. Otherwise, an offside trap can be very dangerous and counterproductive. The activation of the offside trap is valid for the entire game, but can be deactivated via a game action.
Retracted / Walls (2)
Activated, it causes your team to pull way back and counter only sporadically. The team concentrates almost exclusively on the defensive. The effects vary depending on the team's own playing system, the skills of its players and the opponent. This action can have counterproductive effects if the conditions for a wall tactic are not given. The activation is valid for the entire game, but can be deactivated by a game action.
Pressing / Total Attack (3)
Activated, the team plays total on offense and stands very tall. Additionally, you can set which should be the preferred attack type. The effects vary depending on your own game system, skills of your own players and opponents. This action can have counterproductive effects if the prerequisites for the total attack are not given. The activation is valid for the whole game, but can be deactivated by a game action.
For the following standard situations, you can determine which player should perform them.
Corner left
Corner right
Penalty
Direct free kick, over 30 metres
Direct free kick, under 30 metres
Via the button „ADD PLAYER“ one or more players can be added to any situation. The order can be changed by using the arrows or by dragging and dropping. The X can be used to remove a player. The following applies: If the player at the top of the list is currently on the pitch, he will perform the standard situation in question. If he is not on the court, then the next player in the list performs the standard situation. Each list can contain any number of players.
In this section, you can set one or more specific actions to be performed depending on one or more conditions. All game actions are listed in fold-out slots. The order of the slots is also the priority. This means that the slots are always executed from top to bottom. The higher a slot is placed, the greater the probability that the action defined in it will be executed. The action of a slot in the lower area can therefore sometimes not be executed, because these have already become obsolete by actions in slots above. The order can be adjusted via drag & drop, or via the arrow symbol.
An example:
The terms:
The game runs at least the 80th minute
My team leads by 1 goal
The actions:
System change 4-2-3-1 defensive counter
Defensive / Walls
Substitution: DM comes in for Striker
This means that if the team is leading by 1 goal until 10 minutes before the end of the game, they switch to a defensive system, stonewall and a defensive midfielder comes in for a striker. So the result is to be kept.
The following conditions are available:
Score
Here you set the goal difference. Positive value means: your team is leading. A negative goal difference means that your team is behind. Example: The condition is set to a difference of -2. Means: The condition is fulfilled, if the own team is at least 2 goals behind
Minute of play
Restricts the time. So the action will only be executed within the set from / to time.
Game system opponent
As soon as the opponent plays a certain game system this condition is fulfilled. For example, you can react to a tactical change of the opponent.
Failed chance to score
If a player fails to convert a certain number of scoring chances (adjustable from 2-11), this condition is met
Goalkeeper mistake
If the goalkeeper had a bad day and started a certain number of mistakes (2-11 mistakes adjustable) this condition is fulfilled.
Unnumbered
Using this condition, you can set how many players of your own team are on the pitch. This can be used to react to an outnumbered situation. Or you can set an action that is only executed if your team has all 11 games left on the field. The number of players in your team is set here.
Injured player
Takes an action whenever a specific player gets injured
Lost duels
As soon as the player has lost the specified number of tackles, the condition is fulfilled
The following actions are available
Offside trap
Enable or disable.
An offside trap can effectively restrict the opponent's offensive actions. Provided the right system of play and tactically well-trained players, of course. Otherwise, an offside trap can also be very dangerous and counterproductive.
Substitution
Substitutes one player for another. Specifies both the substitute and the substitute.
Defensive / Stonewalling
Activated, it causes your team to retreat far back and counter only sporadically. So the team concentrates almost exclusively on the defensive. The effects vary depending on the team's own system of play, the abilities of its own players and the opponent.
This action can have counterproductive effects if the conditions for wall tactics are not met.
Pressing / Total Attack
Actively, the team plays total on offense and stands very high. Additionally, you can set which should be the preferred attack type. The effects vary depending on your own game system, skills of your own players and opponents.
This action can have counterproductive effects if the prerequisites for the total attack are not given.
System change
Changes the game system during the game. All saved lineups can be selected
If a player of the selected lineup is not currently on the field, the position is replaced with the best matching player who is on the field and is not assigned to a fixed position.
Note: You can change systems a maximum of 2 times per half. Further system changes will be ignored.
The set conditions and actions are summarized in plain text
Wir freuen uns sehr über Ihr Interesse an unserem Unternehmen. Datenschutz hat einen besonders hohen Stellenwert für die Geschäftsleitung der Online-Football-Association GmbH. Eine Nutzung der Internetseiten der Online-Football-Association GmbH ist grundsätzlich ohne jede Angabe personenbezogener Daten möglich. Sofern eine betroffene Person besondere Services unseres Unternehmens über unsere Internetseite in Anspruch nehmen möchte, könnte jedoch eine Verarbeitung personenbezogener Daten erforderlich werden. Ist die Verarbeitung personenbezogener Daten erforderlich und besteht für eine solche Verarbeitung keine gesetzliche Grundlage, holen wir generell eine Einwilligung der betroffenen Person ein.
Die Verarbeitung personenbezogener Daten, beispielsweise des Namens, der Anschrift, EMail-Adresse oder Telefonnummer einer betroffenen Person, erfolgt stets im Einklang mit der Datenschutz-Grundverordnung und in Übereinstimmung mit den für die Online-FootballAssociation GmbH geltenden landesspezifischen Datenschutzbestimmungen. Mittels dieser Datenschutzerklärung möchte unser Unternehmen die Öffentlichkeit über Art, Umfang und Zweck der von uns erhobenen, genutzten und verarbeiteten personenbezogenen Daten informieren. Ferner werden betroffene Personen mittels dieser Datenschutzerklärung über die ihnen zustehenden Rechte aufgeklärt.
Die Online-Football-Association GmbH hat als für die Verarbeitung Verantwortlicher zahlreiche technische und organisatorische Maßnahmen umgesetzt, um einen möglichst lückenlosen Schutz der über diese Internetseite verarbeiteten personenbezogenen Daten sicherzustellen. Dennoch können Internetbasierte Datenübertragungen grundsätzlich Sicherheitslücken aufweisen, sodass ein absoluter Schutz nicht gewährleistet werden kann. Aus diesem Grund steht es jeder betroffenen Person frei, personenbezogene Daten auch auf alternativen Wegen, beispielsweise telefonisch, an uns zu übermitteln.
1. Begriffsbestimmungen Die Datenschutzerklärung der Online-Football-Association GmbH beruht auf den Begrifflichkeiten, die durch den Europäischen Richtlinien- und Verordnungsgeber beim Erlass der Datenschutz-Grundverordnung (DS-GVO) verwendet wurden. Unsere Datenschutzerklärung soll sowohl für die Öffentlichkeit als auch für unsere Kunden und Geschäftspartner einfach lesbar und verständlich sein. Um dies zu gewährleisten, möchten wir vorab die verwendeten Begrifflichkeiten erläutern. Wir verwenden in dieser Datenschutzerklärung unter anderem die folgenden Begriffe:
• a) personenbezogene Daten Personenbezogene Daten sind alle Informationen, die sich auf eine identifizierte oder identifizierbare natürliche Person (im Folgenden „betroffene Person“) beziehen. Als identifizierbar wird eine natürliche Person angesehen, die direkt oder indirekt, insbesondere mittels Zuordnung zu einer Kennung wie einem Namen, zu einer Kennnummer, zu Standortdaten, zu einer Online-Kennung oder zu einem oder mehreren besonderen Merkmalen, die Ausdruck der physischen, physiologischen, genetischen, psychischen, wirtschaftlichen, kulturellen oder sozialen Identität dieser natürlichen Person sind, identifiziert werden kann.
• b) betroffene Person Betroffene Person ist jede identifizierte oder identifizierbare natürliche Person, deren personenbezogene Daten von dem für die Verarbeitung Verantwortlichen verarbeitet werden.
• c) Verarbeitung Verarbeitung ist jeder mit oder ohne Hilfe automatisierter Verfahren ausgeführte Vorgang oder jede solche Vorgangsreihe im Zusammenhang mit personenbezogenen Daten wie das Erheben, das Erfassen, die Organisation, das Ordnen, die Speicherung, die Anpassung oder Veränderung, das Auslesen, das Abfragen, die Verwendung, die Offenlegung durch Übermittlung, Verbreitung oder eine andere Form der Bereitstellung, den Abgleich oder die Verknüpfung, die Einschränkung, das Löschen oder die Vernichtung.
• d) Einschränkung der Verarbeitung Einschränkung der Verarbeitung ist die Markierung gespeicherter personenbezogener Daten mit dem Ziel, ihre künftige Verarbeitung einzuschränken.
• e) Profiling Profiling ist jede Art der automatisierten Verarbeitung personenbezogener Daten, die darin besteht, dass diese personenbezogenen Daten verwendet werden, um bestimmte persönliche Aspekte, die sich auf eine natürliche Person beziehen, zu bewerten, insbesondere, um Aspekte bezüglich Arbeitsleistung, wirtschaftlicher Lage, Gesundheit, persönlicher Vorlieben, Interessen, Zuverlässigkeit, Verhalten, Aufenthaltsort oder Ortswechsel dieser natürlichen Person zu analysieren oder vorherzusagen.
• f) Pseudonymisierung Pseudonymisierung ist die Verarbeitung personenbezogener Daten in einer Weise, auf welche die personenbezogenen Daten ohne Hinzuziehung zusätzlicher Informationen nicht mehr einer spezifischen betroffenen Person zugeordnet werden können, sofern diese zusätzlichen Informationen gesondert aufbewahrt werden und technischen und organisatorischen Maßnahmen unterliegen, die gewährleisten, dass die personenbezogenen Daten nicht einer identifizierten oder identifizierbaren natürlichen Person zugewiesen werden.
• g) Verantwortlicher oder für die Verarbeitung Verantwortlicher Verantwortlicher oder für die Verarbeitung Verantwortlicher ist die natürliche oder juristische Person, Behörde, Einrichtung oder andere Stelle, die allein oder gemeinsam mit anderen über die Zwecke und Mittel der Verarbeitung von personenbezogenen Daten entscheidet. Sind die Zwecke und Mittel dieser Verarbeitung durch das Unionsrecht oder das Recht der Mitgliedstaaten vorgegeben, so kann der Verantwortliche beziehungsweise können die bestimmten Kriterien seiner Benennung nach dem Unionsrecht oder dem Recht der Mitgliedstaaten vorgesehen werden.
• h) Auftragsverarbeiter Auftragsverarbeiter ist eine natürliche oder juristische Person, Behörde, Einrichtung oder andere Stelle, die personenbezogene Daten im Auftrag des Verantwortlichen verarbeitet.
• i) Empfänger Empfänger ist eine natürliche oder juristische Person, Behörde, Einrichtung oder andere Stelle, der personenbezogene Daten offengelegt werden, unabhängig davon, ob es sich bei ihr um einen Dritten handelt oder nicht. Behörden, die im Rahmen eines bestimmten Untersuchungsauftrags nach dem Unionsrecht oder dem Recht der Mitgliedstaaten möglicherweise personenbezogene Daten erhalten, gelten jedoch nicht als Empfänger.
• j) Dritter Dritter ist eine natürliche oder juristische Person, Behörde, Einrichtung oder andere Stelle außer der betroffenen Person, dem Verantwortlichen, dem Auftragsverarbeiter und den Personen, die unter der unmittelbaren Verantwortung des Verantwortlichen oder des Auftragsverarbeiters befugt sind, die personenbezogenen Daten zu verarbeiten.
• k) Einwilligung Einwilligung ist jede von der betroffenen Person freiwillig für den bestimmten Fall in informierter Weise und unmissverständlich abgegebene Willensbekundung in Form einer Erklärung oder einer sonstigen eindeutigen bestätigenden Handlung, mit der die betroffene Person zu verstehen gibt, dass sie mit der Verarbeitung der sie betreffenden personenbezogenen Daten einverstanden ist. 2. Name und Anschrift des für die Verarbeitung Verantwortlichen Verantwortlicher im Sinne der Datenschutz-Grundverordnung, sonstiger in den Mitgliedstaaten der Europäischen Union geltenden Datenschutzgesetze und anderer Bestimmungen mit datenschutzrechtlichem Charakter ist die:
3. Cookies Die Internetseiten der Online-Football-Association GmbH verwenden Cookies. Cookies sind Textdateien, welche über einen Internetbrowser auf einem Computersystem abgelegt und gespeichert werden.
Zahlreiche Internetseiten und Server verwenden Cookies. Viele Cookies enthalten eine sogenannte Cookie-ID. Eine Cookie-ID ist eine eindeutige Kennung des Cookies. Sie besteht aus einer Zeichenfolge, durch welche Internetseiten und Server dem konkreten Internetbrowser zugeordnet werden können, in dem das Cookie gespeichert wurde. Dies ermöglicht es den besuchten Internetseiten und Servern, den individuellen Browser der betroffenen Person von anderen Internetbrowsern, die andere Cookies enthalten, zu unterscheiden. Ein bestimmter Internetbrowser kann über die eindeutige Cookie-ID wiedererkannt und identifiziert werden.
Durch den Einsatz von Cookies kann die Online-Football-Association GmbH den Nutzern dieser Internetseite nutzerfreundlichere Services bereitstellen, die ohne die Cookie-Setzung nicht möglich wären.
Mittels eines Cookies können die Informationen und Angebote auf unserer Internetseite im Sinne des Benutzers optimiert werden. Cookies ermöglichen uns, wie bereits erwähnt, die Benutzer unserer Internetseite wiederzuerkennen. Zweck dieser Wiedererkennung ist es, den Nutzern die Verwendung unserer Internetseite zu erleichtern. Der Benutzer einer Internetseite, die Cookies verwendet, muss beispielsweise nicht bei jedem Besuch der Internetseite erneut seine Zugangsdaten eingeben, weil dies von der Internetseite und dem auf dem Computersystem des Benutzers abgelegten Cookie übernommen wird. Ein weiteres Beispiel ist das Cookie eines Warenkorbes im Online-Shop. Der Online-Shop merkt sich die Artikel, die ein Kunde in den virtuellen Warenkorb gelegt hat, über ein Cookie.
Die betroffene Person kann die Setzung von Cookies durch unsere Internetseite jederzeit mittels einer entsprechenden Einstellung des genutzten Internetbrowsers verhindern und damit der Setzung von Cookies dauerhaft widersprechen. Ferner können bereits gesetzte Cookies jederzeit über einen Internetbrowser oder andere Softwareprogramme gelöscht werden. Dies ist in allen gängigen Internetbrowsern möglich. Deaktiviert die betroffene Person die Setzung von Cookies in dem genutzten Internetbrowser, sind unter Umständen nicht alle Funktionen unserer Internetseite vollumfänglich nutzbar.
4. Erfassung von allgemeinen Daten und Informationen Die Internetseite der Online-Football-Association GmbH erfasst mit jedem Aufruf der Internetseite durch eine betroffene Person oder ein automatisiertes System eine Reihe von allgemeinen Daten und Informationen. Diese allgemeinen Daten und Informationen werden in den Logfiles des Servers gespeichert. Erfasst werden können die (1) verwendeten Browsertypen und Versionen, (2) das vom zugreifenden System verwendete Betriebssystem, (3) die Internetseite, von welcher ein zugreifendes System auf unsere Internetseite gelangt (sogenannte Referrer), (4) die Unterwebseiten, welche über ein zugreifendes System auf unserer Internetseite angesteuert werden, (5) das Datum und die Uhrzeit eines Zugriffs auf die Internetseite, (6) eine Internet-Protokoll-Adresse (IP-Adresse), (7) der Internet-ServiceProvider des zugreifenden Systems und (8) sonstige ähnliche Daten und Informationen, die der Gefahrenabwehr im Falle von Angriffen auf unsere informationstechnologischen Systeme dienen.
Bei der Nutzung dieser allgemeinen Daten und Informationen zieht die Online-FootballAssociation GmbH keine Rückschlüsse auf die betroffene Person. Diese Informationen werden vielmehr benötigt, um (1) die Inhalte unserer Internetseite korrekt auszuliefern, (2) die Inhalte unserer Internetseite sowie die Werbung für diese zu optimieren, (3) die dauerhafte Funktionsfähigkeit unserer informationstechnologischen Systeme und der Technik unserer Internetseite zu gewährleisten sowie (4) um Strafverfolgungsbehörden im Falle eines Cyberangriffes die zur Strafverfolgung notwendigen Informationen bereitzustellen. Diese anonym erhobenen Daten und Informationen werden durch die Online-Football-Association GmbH daher einerseits statistisch und ferner mit dem Ziel ausgewertet, den Datenschutz und die Datensicherheit in unserem Unternehmen zu erhöhen, um letztlich ein optimales Schutzniveau für die von uns verarbeiteten personenbezogenen Daten sicherzustellen. Die anonymen Daten der Server-Logfiles werden getrennt von allen durch eine betroffene Person angegebenen personenbezogenen Daten gespeichert.
5. Registrierung auf unserer Internetseite und für das Spiel Die betroffene Person hat die Möglichkeit, sich auf der Internetseite des für die Verarbeitung Verantwortlichen unter Angabe von personenbezogenen Daten zu registrieren. Welche personenbezogenen Daten dabei an den für die Verarbeitung Verantwortlichen übermittelt werden, ergibt sich aus der jeweiligen Eingabemaske, die für die Registrierung verwendet wird. Die von der betroffenen Person eingegebenen personenbezogenen Daten werden ausschließlich für die interne Verwendung bei dem für die Verarbeitung Verantwortlichen und für eigene Zwecke erhoben und gespeichert. Der für die Verarbeitung Verantwortliche kann die Weitergabe an einen oder mehrere Auftragsverarbeiter, beispielsweise einen Paketdienstleister, veranlassen, der die personenbezogenen Daten ebenfalls ausschließlich für eine interne Verwendung, die dem für die Verarbeitung Verantwortlichen zuzurechnen ist, nutzt.
Durch eine Registrierung auf der Internetseite des für die Verarbeitung Verantwortlichen wird ferner die vom Internet-Service-Provider (ISP) der betroffenen Person vergebene IPAdresse, das Datum sowie die Uhrzeit der Registrierung gespeichert. Die Speicherung dieser Daten erfolgt vor dem Hintergrund, dass nur so der Missbrauch unserer Dienste verhindert werden kann, und diese Daten im Bedarfsfall ermöglichen, begangene Straftaten aufzuklären. Insofern ist die Speicherung dieser Daten zur Absicherung des für die Verarbeitung Verantwortlichen erforderlich. Eine Weitergabe dieser Daten an Dritte erfolgt grundsätzlich nicht, sofern keine gesetzliche Pflicht zur Weitergabe besteht oder die Weitergabe der Strafverfolgung dient.
Die Registrierung der betroffenen Person unter freiwilliger Angabe personenbezogener Daten dient dem für die Verarbeitung Verantwortlichen dazu, der betroffenen Person Inhalte oder Leistungen anzubieten, die aufgrund der Natur der Sache nur registrierten Benutzern angeboten werden können. Registrierten Personen steht die Möglichkeit frei, die bei der Registrierung angegebenen personenbezogenen Daten jederzeit abzuändern oder vollständig aus dem Datenbestand des für die Verarbeitung Verantwortlichen löschen zu lassen.
Der für die Verarbeitung Verantwortliche erteilt jeder betroffenen Person jederzeit auf Anfrage Auskunft darüber, welche personenbezogenen Daten über die betroffene Person gespeichert sind. Ferner berichtigt oder löscht der für die Verarbeitung Verantwortliche personenbezogene Daten auf Wunsch oder Hinweis der betroffenen Person, soweit dem keine gesetzlichen Aufbewahrungspflichten entgegenstehen. Die Gesamtheit der Mitarbeiter des für die Verarbeitung Verantwortlichen stehen der betroffenen Person in diesem Zusammenhang als Ansprechpartner zur Verfügung.
Um das Spielangebot von onlineliga.de Nutzen zu können ist eine Registrierung erforderlich. Bei der Registrierung muss der Nutzer eine E-Mail-Adresse angeben, ein Passwort und einen Managernamen wählen. Die Eingabe einer Postleitzahl bzw. eines Ortes ist notwendig, weil sie sich auf einen Kerninhalt unseres Spiels bezieht. Allerdings bleibt es dem Nutzer überlassen, ob diese Angaben (PLZ, Ort, Managername) den tatsächlichen Daten entsprechen. Durch Eingabe dieser Daten bei der Registrierung, erteilt die betroffene Person die Einwilligung, diese Daten (PLZ, Ort, Managername) der Online-Football-Association GmbH bzw. anderen Nutzern die am gemeinsamen Spiel teilnehmen, als Spielinhalt zur Verfügung zu stellen.
6. Abonnement unseres Newsletters Auf der Internetseite der Online-Football-Association GmbH wird den Benutzern die Möglichkeit eingeräumt, den Newsletter unseres Unternehmens zu abonnieren. Welche personenbezogenen Daten bei der Bestellung des Newsletters an den für die Verarbeitung Verantwortlichen übermittelt werden, ergibt sich aus der hierzu verwendeten Eingabemaske. Die Online-Football-Association GmbH informiert ihre Kunden und Geschäftspartner in regelmäßigen Abständen im Wege eines Newsletters über Angebote des Unternehmens. Der Newsletter unseres Unternehmens kann von der betroffenen Person grundsätzlich nur dann empfangen werden, wenn (1) die betroffene Person über eine gültige E-Mail-Adresse verfügt und (2) die betroffene Person sich für den Newsletterversand registriert. An die von einer betroffenen Person erstmalig für den Newsletterversand eingetragene E-Mail-Adresse wird aus rechtlichen Gründen eine Bestätigungsmail im Double-Opt-In-Verfahren versendet. Diese Bestätigungsmail dient der Überprüfung, ob der Inhaber der E-Mail-Adresse als betroffene Person den Empfang des Newsletters autorisiert hat.
Bei der Anmeldung zum Newsletter speichern wir ferner die vom Internet-Service-Provider (ISP) vergebene IP-Adresse des von der betroffenen Person zum Zeitpunkt der Anmeldung verwendeten Computersystems sowie das Datum und die Uhrzeit der Anmeldung. Die Erhebung dieser Daten ist erforderlich, um den(möglichen) Missbrauch der E-Mail-Adresse einer betroffenen Person zu einem späteren Zeitpunkt nachvollziehen zu können und dient deshalb der rechtlichen Absicherung des für die Verarbeitung Verantwortlichen. Die im Rahmen einer Anmeldung zum Newsletter erhobenen personenbezogenen Daten werden ausschließlich zum Versand unseres Newsletters verwendet. Ferner könnten Abonnenten des Newsletters per E-Mail informiert werden, sofern dies für den Betrieb des Newsletter-Dienstes oder eine diesbezügliche Registrierung erforderlich ist, wie dies im Falle von Änderungen am Newsletterangebot oder bei der Veränderung der technischen Gegebenheiten der Fall sein könnte. Es erfolgt keine Weitergabe der im Rahmen des Newsletter-Dienstes erhobenen personenbezogenen Daten an Dritte. Das Abonnement unseres Newsletters kann durch die betroffene Person jederzeit gekündigt werden. Die Einwilligung in die Speicherung personenbezogener Daten, die die betroffene Person uns für den Newsletterversand erteilt hat, kann jederzeit widerrufen werden. Zum Zwecke des Widerrufs der Einwilligung findet sich in jedem Newsletter ein entsprechender Link. Ferner besteht die Möglichkeit, sich jederzeit auch direkt auf der Internetseite des für die Verarbeitung Verantwortlichen vom Newsletterversand abzumelden oder dies dem für die Verarbeitung Verantwortlichen auf andere Weise mitzuteilen.
Mit dem Setzen des Häkchens bei der Registrierung „Benachrichtigungen erhalten“ geben Sie uns Ihre ausdrückliche Einwilligung zum Empfang, von E-Mail-Benachrichtigungen die in direktem Zusammenhang mit unserem Spielangebot stehen und des Newsletters. Dies sind z.B. E-Mail Mitteilungen zur Registrierung, zur Ligensuche, Ligenzuteilung, zum Spielverlauf oder zum Entwicklungsstand unseres Browser-Spiels.
7. Newsletter-Tracking Die Newsletter der Online-Football-Association GmbH enthalten sogenannte Zählpixel. Ein Zählpixel ist eine Miniaturgrafik, die in solche E-Mails eingebettet wird, welche im HTMLFormat versendet werden, um eine Logdatei-Aufzeichnung und eine Logdatei-Analyse zu ermöglichen. Dadurch kann eine statistische Auswertung des Erfolges oder Misserfolges von Online-Marketing-Kampagnen durchgeführt werden. Anhand des eingebetteten Zählpixels kann die Online-Football-Association GmbH erkennen, ob und wann eine E-Mail von einer betroffenen Person geöffnet wurde und welche in der E-Mail befindlichen Links von der betroffenen Person aufgerufen wurden.
Solche über die in den Newslettern enthaltenen Zählpixel erhobenen personenbezogenen Daten, werden von dem für die Verarbeitung Verantwortlichen gespeichert und ausgewertet, um den Newsletterversand zu optimieren und den Inhalt zukünftiger Newsletter noch besser den Interessen der betroffenen Person anzupassen. Diese personenbezogenen Daten werden nicht an Dritte weitergegeben. Betroffene Personen sind jederzeit berechtigt, die diesbezügliche gesonderte, über das Double-Opt-In-Verfahren abgegebene Einwilligungserklärung zu widerrufen. Nach einem Widerruf werden diese personenbezogenen Daten von dem für die Verarbeitung Verantwortlichen gelöscht. Eine Abmeldung vom Erhalt des Newsletters deutet die Online-Football-Association GmbH automatisch als Widerruf.
8. Kontaktmöglichkeit über die Internetseite Die Internetseite der Online-Football-Association GmbH enthält aufgrund von gesetzlichen Vorschriften Angaben, die eine schnelle elektronische Kontaktaufnahme zu unserem Unternehmen sowie eine unmittelbare Kommunikation mit uns ermöglichen, was ebenfalls eine allgemeine Adresse der sogenannten elektronischen Post (E-Mail-Adresse) umfasst. Sofern eine betroffene Person per E-Mail oder über ein Kontaktformular den Kontakt mit dem für die Verarbeitung Verantwortlichen aufnimmt, werden die von der betroffenen Person übermittelten personenbezogenen Daten automatisch gespeichert. Solche auf freiwilliger Basis von einer betroffenen Person an den für die Verarbeitung Verantwortlichen übermittelten personenbezogenen Daten werden für Zwecke der Bearbeitung oder der Kontaktaufnahme zur betroffenen Person gespeichert. Es erfolgt keine Weitergabe dieser personenbezogenen Daten an Dritte.
9. Routinemäßige Löschung und Sperrung von personenbezogenen Daten Der für die Verarbeitung Verantwortliche verarbeitet und speichert personenbezogene Daten der betroffenen Person nur für den Zeitraum, der zur Erreichung des Speicherungszwecks erforderlich ist oder sofern dies durch den Europäischen Richtlinien- und Verordnungsgeber oder einen anderen Gesetzgeber in Gesetzen oder Vorschriften, welchen der für die Verarbeitung Verantwortliche unterliegt, vorgesehen wurde. Entfällt der Speicherungszweck oder läuft eine vom Europäischen Richtlinien- und Verordnungsgeber oder einem anderen zuständigen Gesetzgeber vorgeschriebene Speicherfrist ab, werden die personenbezogenen Daten routinemäßig und entsprechend den gesetzlichen Vorschriften gesperrt oder gelöscht. 10. Rechte der betroffenen Person
• a) Recht auf Bestätigung Jede betroffene Person hat das vom Europäischen Richtlinien- und Verordnungsgeber eingeräumte Recht, von dem für die Verarbeitung Verantwortlichen eine Bestätigung darüber zu verlangen, ob sie betreffende personenbezogene Daten verarbeitet werden. Möchte eine betroffene Person dieses Bestätigungsrecht in Anspruch nehmen, kann sie sich hierzu jederzeit an einen Mitarbeiter des für die Verarbeitung Verantwortlichen wenden.
• b) Recht auf Auskunft Jede von der Verarbeitung personenbezogener Daten betroffene Person hat das vom Europäischen Richtlinien- und Verordnungsgeber gewährte Recht, jederzeit von dem für die Verarbeitung Verantwortlichen unentgeltliche Auskunft über die zu seiner Person gespeicherten personenbezogenen Daten und eine Kopie dieser Auskunft zu erhalten. Ferner hat der Europäische Richtlinien- und Verordnungsgeber der betroffenen Person Auskunft über folgende Informationen zugestanden: o die Verarbeitungszwecke o die Kategorien personenbezogener Daten, die verarbeitet werden o die Empfänger oder Kategorien von Empfängern, gegenüber denen die personenbezogenen Daten offengelegt worden sind oder noch offengelegt werden, insbesondere bei Empfängern in Drittländern oder bei internationalen Organisationen o falls möglich die geplante Dauer, für die die personenbezogenen Daten gespeichert werden, oder, falls dies nicht möglich ist, die Kriterien für die Festlegung dieser Dauer o das Bestehen eines Rechts auf Berichtigung oder Löschung der sie betreffenden personenbezogenen Daten oder auf Einschränkung der Verarbeitung durch den Verantwortlichen oder eines Widerspruchsrechts gegen diese Verarbeitung o das Bestehen eines Beschwerderechts bei einer Aufsichtsbehörde o wenn die personenbezogenen Daten nicht bei der betroffenen Person erhoben werden: Alle verfügbaren Informationen über die Herkunft der Daten o das Bestehen einer automatisierten Entscheidungsfindung einschließlich Profiling gemäß Artikel 22 Abs.1 und 4 DS-GVO und — zumindest in diesen Fällen — aussagekräftige Informationen über die involvierte Logik sowie die Tragweite und die angestrebten Auswirkungen einer derartigen Verarbeitung für die betroffene Person Ferner steht der betroffenen Person ein Auskunftsrecht darüber zu, ob personenbezogene Daten an ein Drittland oder an eine internationale Organisation übermittelt wurden. Sofern dies der Fall ist, so steht der betroffenen Person im Übrigen das Recht zu, Auskunft über die geeigneten Garantien im Zusammenhang mit der Übermittlung zu erhalten. Möchte eine betroffene Person dieses Auskunftsrecht in Anspruch nehmen, kann sie sich hierzu jederzeit an einen Mitarbeiter des für die Verarbeitung Verantwortlichen wenden.
• c) Recht auf Berichtigung Jede von der Verarbeitung personenbezogener Daten betroffene Person hat das vom Europäischen Richtlinien- und Verordnungsgeber gewährte Recht, die unverzügliche Berichtigung sie betreffender unrichtiger personenbezogener Daten zu verlangen. Ferner steht der betroffenen Person das Recht zu, unter Berücksichtigung der Zwecke der Verarbeitung, die Vervollständigung unvollständiger personenbezogener Daten — auch mittels einer ergänzenden Erklärung — zu verlangen. Möchte eine betroffene Person dieses Berichtigungsrecht in Anspruch nehmen, kann sie sich hierzu jederzeit an einen Mitarbeiter des für die Verarbeitung Verantwortlichen wenden.
• d) Recht auf Löschung (Recht auf Vergessen werden) Jede von der Verarbeitung personenbezogener Daten betroffene Person hat das vom Europäischen Richtlinien- und Verordnungsgeber gewährte Recht, von dem Verantwortlichen zu verlangen, dass die sie betreffenden personenbezogenen Daten unverzüglich gelöscht werden, sofern einer der folgenden Gründe zutrifft und soweit die Verarbeitung nicht erforderlich ist: o Die personenbezogenen Daten wurden für solche Zwecke erhoben oder auf sonstige Weise verarbeitet, für welche sie nicht mehr notwendig sind. o Die betroffene Person widerruft ihre Einwilligung, auf die sich die Verarbeitung gemäß Art. 6 Abs. 1 Buchstabe a DS-GVO oder Art. 9 Abs. 2 Buchstabe a DS-GVO stützte, und es fehlt an einer anderweitigen Rechtsgrundlage für die Verarbeitung. o Die betroffene Person legt gemäß Art. 21 Abs. 1 DS-GVO Widerspruch gegen die Verarbeitung ein, und es liegen keine vorrangigen berechtigten Gründe für die Verarbeitung vor, oder die betroffene Person legt gemäß Art. 21 Abs. 2 DS-GVO Widerspruch gegen die Verarbeitung ein. o Die personenbezogenen Daten wurden unrechtmäßig verarbeitet. o Die Löschung der personenbezogenen Daten ist zur Erfüllung einer rechtlichen Verpflichtung nach dem Unionsrecht oder dem Recht der Mitgliedstaaten erforderlich, dem der Verantwortliche unterliegt. o Die personenbezogenen Daten wurden in Bezug auf angebotene Dienste der Informationsgesellschaft gemäß Art. 8 Abs. 1 DS-GVO erhoben. Sofern einer der oben genannten Gründe zutrifft und eine betroffene Person die Löschung von personenbezogenen Daten, die bei der Online-Football-Association GmbH gespeichert sind, veranlassen möchte, kann sie sich hierzu jederzeit an einen Mitarbeiter des für die Verarbeitung Verantwortlichen wenden. Der Mitarbeiter der Online-Football-Association GmbH wird veranlassen, dass dem Löschverlangen unverzüglich nachgekommen wird.
Wurden die personenbezogenen Daten von der Online-Football-Association GmbH öffentlich gemacht und ist unser Unternehmen als Verantwortlicher gemäß Art. 17 Abs. 1 DS-GVO zur Löschung der personenbezogenen Daten verpflichtet, so trifft die Online-Football-Association GmbH unter Berücksichtigung der verfügbaren Technologie und der Implementierungskosten angemessene Maßnahmen, auch technischer Art, um andere für die Datenverarbeitung Verantwortliche, welche die veröffentlichten personenbezogenen Daten verarbeiten, darüber in Kenntnis zu setzen, dass die betroffene Person von diesen anderen für die Datenverarbeitung Verantwortlichen die Löschung sämtlicher Links zu diesen personenbezogenen Daten oder von Kopien oder Replikationen dieser personenbezogenen Daten verlangt hat, soweit die Verarbeitung nicht erforderlich ist. Der Mitarbeiter der Online-Football-Association GmbH wird im Einzelfall das Notwendige veranlassen.
• e) Recht auf Einschränkung der Verarbeitung Jede von der Verarbeitung personenbezogener Daten betroffene Person hat das vom Europäischen Richtlinien- und Verordnungsgeber gewährte Recht, von dem Verantwortlichen die Einschränkung der Verarbeitung zu verlangen, wenn eine der folgenden Voraussetzungen gegeben ist: o Die Richtigkeit der personenbezogenen Daten wird von der betroffenen Person bestritten, und zwar für eine Dauer, die es dem Verantwortlichen ermöglicht, die Richtigkeit der personenbezogenen Daten zu überprüfen. o Die Verarbeitung ist unrechtmäßig, die betroffene Person lehnt die Löschung der personenbezogenen Daten ab und verlangt stattdessen die Einschränkung der Nutzung der personenbezogenen Daten. o Der Verantwortliche benötigt die personenbezogenen Daten für die Zwecke der Verarbeitung nicht länger, die betroffene Person benötigt sie jedoch zur Geltendmachung, Ausübung oder Verteidigung von Rechtsansprüchen. o Die betroffene Person hat Widerspruch gegen die Verarbeitung gem. Art. 21 Abs. 1 DS-GVO eingelegt und es steht noch nicht fest, ob die berechtigten Gründe des Verantwortlichen gegenüber denen der betroffenen Person überwiegen.
Sofern eine der oben genannten Voraussetzungen gegeben ist und eine betroffene Person die Einschränkung von personenbezogenen Daten, die bei der OnlineFootball-Association GmbH gespeichert sind, verlangen möchte, kann sie sich hierzu jederzeit an einen Mitarbeiter des für die Verarbeitung Verantwortlichen wenden. Der Mitarbeiter der Online-Football-Association GmbH wird die Einschränkung der Verarbeitung veranlassen.
• f) Recht auf Datenübertragbarkeit Jede von der Verarbeitung personenbezogener Daten betroffene Person hat das vom Europäischen Richtlinien- und Verordnungsgeber gewährte Recht, die sie betreffenden personenbezogenen Daten, welche durch die betroffene Person einem Verantwortlichen bereitgestellt wurden, in einem strukturierten, gängigen und maschinenlesbaren Format zu erhalten. Sie hat außerdem das Recht, diese Daten einem anderen Verantwortlichen ohne Behinderung durch den Verantwortlichen, dem die personenbezogenen Daten bereitgestellt wurden, zu übermitteln, sofern die Verarbeitung auf der Einwilligung gemäß Art. 6 Abs. 1 Buchstabe a DS-GVO oder Art. 9 Abs. 2 Buchstabe a DS-GVO oder auf einem Vertrag gemäß Art. 6 Abs. 1 Buchstabe b DS-GVO beruht und die Verarbeitung mithilfe automatisierter Verfahren erfolgt, sofern die Verarbeitung nicht für die Wahrnehmung einer Aufgabe erforderlich ist, die im öffentlichen Interesse liegt oder in Ausübung öffentlicher Gewalt erfolgt, welche dem Verantwortlichen übertragen wurde.
Ferner hat die betroffene Person bei der Ausübung ihres Rechts auf Datenübertragbarkeit gemäß Art. 20 Abs. 1 DS-GVO das Recht, zu erwirken, dass die personenbezogenen Daten direkt von einem Verantwortlichen an einen anderen Verantwortlichen übermittelt werden, soweit dies technisch machbar ist und sofern hiervon nicht die Rechte und Freiheiten anderer Personen beeinträchtigt werden. Zur Geltendmachung des Rechts auf Datenübertragbarkeit kann sich die betroffene Person jederzeit an einen Mitarbeiter der Online-Football-Association GmbH wenden.
• g) Recht auf Widerspruch Jede von der Verarbeitung personenbezogener Daten betroffene Person hat das vom Europäischen Richtlinien- und Verordnungsgeber gewährte Recht, aus Gründen, die sich aus ihrer besonderen Situation ergeben, jederzeit gegen die Verarbeitung sie betreffender personenbezogener Daten, die aufgrund von Art. 6 Abs. 1 Buchstaben e oder f DS-GVO erfolgt, Widerspruch einzulegen. Dies gilt auch für ein auf diese Bestimmungen gestütztes Profiling.
Die Online-Football-Association GmbH verarbeitet die personenbezogenen Daten im Falle des Widerspruchs nicht mehr, es sei denn, wir können zwingende schutzwürdige Gründe für die Verarbeitung nachweisen, die den Interessen, Rechten und Freiheiten der betroffenen Person überwiegen, oder die Verarbeitung dient der Geltendmachung, Ausübung oder Verteidigung von Rechtsansprüchen. Verarbeitet die Online-Football-Association GmbH personenbezogene Daten, um Direktwerbung zu betreiben, so hat die betroffene Person das Recht, jederzeit Widerspruch gegen die Verarbeitung der personenbezogenen Daten zum Zwecke derartiger Werbung einzulegen. Dies gilt auch für das Profiling, soweit es mit solcher Direktwerbung in Verbindung steht. Widerspricht die betroffene Person gegenüber der Online-Football-Association GmbH der Verarbeitung für Zwecke der Direktwerbung, so wird die Online-Football-Association GmbH die personenbezogenen Daten nicht mehr für diese Zwecke verarbeiten.
Zudem hat die betroffene Person das Recht, aus Gründen, die sich aus ihrer besonderen Situation ergeben, gegen die sie betreffende Verarbeitung personenbezogener Daten, die bei der Online-Football-Association GmbH zu wissenschaftlichen oder historischen Forschungszwecken oder zu statistischen Zwecken gemäß Art. 89 Abs. 1 DS-GVO erfolgen, Widerspruch einzulegen, es sei denn, eine solche Verarbeitung ist zur Erfüllung einer im öffentlichen Interesse liegenden Aufgabe erforderlich.
Zur Ausübung des Rechts auf Widerspruch kann sich die betroffene Person direkt jeden Mitarbeiter der Online-Football-Association GmbH oder einen anderen Mitarbeiter wenden. Der betroffenen Person steht es ferner frei, im Zusammenhang mit der Nutzung von Diensten der Informationsgesellschaft, ungeachtet der Richtlinie 2002/58/EG, ihr Widerspruchsrecht mittels automatisierter Verfahren auszuüben, bei denen technische Spezifikationen verwendet werden.
• h) Automatisierte Entscheidungen im Einzelfall einschließlich Profiling Jede von der Verarbeitung personenbezogener Daten betroffene Person hat das vom Europäischen Richtlinien- und Verordnungsgeber gewährte Recht, nicht einer ausschließlich auf einer automatisierten Verarbeitung — einschließlich Profiling — beruhenden Entscheidung unterworfen zu werden, die ihr gegenüber rechtliche Wirkung entfaltet oder sie in ähnlicher Weise erheblich beeinträchtigt, sofern die Entscheidung (1) nicht für den Abschluss oder die Erfüllung eines Vertrags zwischen der betroffenen Person und dem Verantwortlichen erforderlich ist, oder (2) aufgrund von Rechtsvorschriften der Union oder der Mitgliedstaaten, denen der Verantwortliche unterliegt, zulässig ist und diese Rechtsvorschriften angemessene Maßnahmen zur Wahrung der Rechte und Freiheiten sowie der berechtigten Interessen der betroffenen Person enthalten oder (3) mit ausdrücklicher Einwilligung der betroffenen Person erfolgt.
Ist die Entscheidung (1) für den Abschluss oder die Erfüllung eines Vertrags zwischen der betroffenen Person und dem Verantwortlichen erforderlich oder (2) erfolgt sie mit ausdrücklicher Einwilligung der betroffenen Person, trifft die OnlineFootball-Association GmbH angemessene Maßnahmen, um die Rechte und Freiheiten sowie die berechtigten Interessen der betroffenen Person zu wahren, wozu mindestens das Recht auf Erwirkung des Eingreifens einer Person seitens des Verantwortlichen, auf Darlegung des eigenen Standpunkts und auf Anfechtung der Entscheidung gehört.
Möchte die betroffene Person Rechte mit Bezug auf automatisierte Entscheidungen geltend machen, kann sie sich hierzu jederzeit an einen Mitarbeiter des für die Verarbeitung Verantwortlichen wenden.
• i) Recht auf Widerruf einer datenschutzrechtlichen Einwilligung Jede von der Verarbeitung personenbezogener Daten betroffene Person hat das vom Europäischen Richtlinien- und Verordnungsgeber gewährte Recht, eine Einwilligung zur Verarbeitung personenbezogener Daten jederzeit zu widerrufen. Möchte die betroffene Person ihr Recht auf Widerruf einer Einwilligung geltend machen, kann sie sich hierzu jederzeit an einen Mitarbeiter des für die Verarbeitung Verantwortlichen wenden.
11. Rechtsgrundlage der Verarbeitung Art. 6 I lit. a DS-GVO dient unserem Unternehmen als Rechtsgrundlage für Verarbeitungsvorgänge, bei denen wir eine Einwilligung für einen bestimmten Verarbeitungszweck einholen. Ist die Verarbeitung personenbezogener Daten zur Erfüllung eines Vertrags, dessen Vertragspartei die betroffene Person ist, erforderlich, wie dies beispielsweise bei Verarbeitungsvorgängen der Fall ist, die für eine Lieferung von Waren oder die Erbringung einer sonstigen Leistung oder Gegenleistung notwendig sind, so beruht die Verarbeitung auf Art. 6 I lit. b DS-GVO. Gleiches gilt für solche Verarbeitungsvorgänge die zur Durchführung vorvertraglicher Maßnahmen erforderlich sind, etwa in Fällen von Anfragen zur unseren Produkten oder Leistungen. Unterliegt unser Unternehmen einer rechtlichen Verpflichtung durch welche eine Verarbeitung von personenbezogenen Daten erforderlich wird, wie beispielsweise zur Erfüllung steuerlicher Pflichten, so basiert die Verarbeitung auf Art. 6 I lit. c DS-GVO. In seltenen Fällen könnte die Verarbeitung von personenbezogenen Daten erforderlich werden, um lebenswichtige Interessen der betroffenen Person oder einer anderen natürlichen Person zu schützen. Dies wäre beispielsweise der Fall, wenn ein Besucher in unserem Betrieb verletzt werden würde und daraufhin sein Name, sein Alter, seine Krankenkassendaten oder sonstige lebenswichtige Informationen an einen Arzt, ein Krankenhaus oder sonstige Dritte weitergegeben werden müssten. Dann würde die Verarbeitung auf Art. 6 I lit. d DS-GVO beruhen. Letztlich könnten Verarbeitungsvorgänge auf Art. 6 I lit. f DS-GVO beruhen. Auf dieser Rechtsgrundlage basieren Verarbeitungsvorgänge, die von keiner der vorgenannten Rechtsgrundlagen erfasst werden, wenn die Verarbeitung zur Wahrung eines berechtigten Interesses unseres Unternehmens oder eines Dritten erforderlich ist, sofern die Interessen, Grundrechte und Grundfreiheiten des Betroffenen nicht überwiegen. Solche Verarbeitungsvorgänge sind uns insbesondere deshalb gestattet, weil sie durch den Europäischen Gesetzgeber besonders erwähnt wurden. Er vertrat insoweit die Auffassung, dass ein berechtigtes Interesse anzunehmen sein könnte, wenn die betroffene Person ein Kunde des Verantwortlichen ist (Erwägungsgrund 47 Satz 2 DS-GVO).
12. Berechtigte Interessen an der Verarbeitung, die von dem Verantwortlichen oder einem Dritten verfolgt werden
Basiert die Verarbeitung personenbezogener Daten auf Artikel 6 I lit. f DS-GVO ist unser berechtigtes Interesse die Durchführung unserer Geschäftstätigkeit zugunsten des Wohlergehens all unserer Mitarbeiter und unserer Anteilseigner.
13. Dauer, für die die personenbezogenen Daten gespeichert werden Das Kriterium für die Dauer der Speicherung von personenbezogenen Daten ist die jeweilige gesetzliche Aufbewahrungsfrist. Nach Ablauf der Frist werden die entsprechenden Daten routinemäßig gelöscht, sofern sie nicht mehr zur Vertragserfüllung oder Vertragsanbahnung erforderlich sind.
Wir speichern Ihre Daten solange, wie dies zur Erbringung unseres Online-Angebots und der damit verbundenen Services erforderlich ist bzw. wir ein berechtigtes Interesse an der weiteren Speicherung haben.
14. Gesetzliche oder vertragliche Vorschriften zur Bereitstellung der personenbezogenen Daten; Erforderlichkeit für den Vertragsabschluss; Verpflichtung der betroffenen Person, die personenbezogenen Daten bereitzustellen; mögliche Folgen der Nichtbereitstellung Wir klären Sie darüber auf, dass die Bereitstellung personenbezogener Daten zum Teil gesetzlich vorgeschrieben ist (z.B. Steuervorschriften) oder sich auch aus vertraglichen Regelungen (z.B. Angaben zum Vertragspartner) ergeben kann. Mitunter kann es zu einem Vertragsschluss erforderlich sein, dass eine betroffene Person uns personenbezogene Daten zur Verfügung stellt, die in der Folge durch uns verarbeitet werden müssen. Die betroffene Person ist beispielsweise verpflichtet uns personenbezogene Daten bereitzustellen, wenn unser Unternehmen mit ihr einen Vertrag abschließt. Eine Nichtbereitstellung der personenbezogenen Daten hätte zur Folge, dass der Vertrag mit dem Betroffenen nicht geschlossen werden könnte. Vor einer Bereitstellung personenbezogener Daten durch den Betroffenen muss sich der Betroffene an einen unserer Mitarbeiter wenden. Unser Mitarbeiter klärt den Betroffenen einzelfallbezogen darüber auf, ob die Bereitstellung der personenbezogenen Daten gesetzlich oder vertraglich vorgeschrieben oder für den Vertragsabschluss erforderlich ist, ob eine Verpflichtung besteht, die personenbezogenen Daten bereitzustellen, und welche Folgen die Nichtbereitstellung der personenbezogenen Daten hätte.
15. Bestehen einer automatisierten Entscheidungsfindung Als verantwortungsbewusstes Unternehmen verzichten wir auf eine automatische Entscheidungsfindung oder ein Profiling.
16. Google Analytics Diese Website benutzt den Webanalysedienst Google Analytics und Google AnalyticsBerichte zur Auswertung von demografischen Merkmalen und Interessen. Dies sind Dienstleistungen der Google Inc. (“Google”). Google Analytics verwendet sog. “Cookies”, Textdateien, die auf Ihrem Computer gespeichert werden und die eine Analyse der Benutzung der Website durch Sie ermöglichen. Die durch den Cookie erzeugten Informationen über Ihre Benutzung dieser Website werden in der Regel an einen Server von Google in den USA übertragen und dort gespeichert. Im Falle der Aktivierung der IPAnonymisierung auf dieser Webseite, wird Ihre IP-Adresse von Google jedoch innerhalb von Mitgliedstaaten der Europäischen Union oder in anderen Vertragsstaaten des Abkommens über den Europäischen Wirtschaftsraum zuvor gekürzt. Nur in Ausnahmefällen wird die volle IP-Adresse an einen Server von Google in den USA übertragen und dort gekürzt. Im Auftrag des Betreibers dieser Website wird Google diese Informationen benutzen, um Ihre Nutzung der Website auszuwerten, um Reports über die Websiteaktivitäten zusammenzustellen und um weitere mit der Websitenutzung und der Internetnutzung verbundene Dienstleistungen gegenüber dem Websitebetreiber zu erbringen. Der Betreiber dieser Website wird Daten, die über interessenbezogene Werbung von Google sowie Besucherdaten von Drittanbietern (z.B. Alter, Geschlecht und Interessen) erlangt werden, auswerten, um mehr über die Nutzer dieser Website zu erfahren. Dabei findet keine personenbezogene Verwendung sondern lediglich eine statistische Auswertung anonymisierter Datensätze statt. Die im Rahmen von Google Analytics von Ihrem Browser übermittelte IP-Adresse wird nicht mit anderen Daten von Google zusammengeführt. Sie können die Speicherung der Cookies durch eine entsprechende Einstellung Ihrer Browser-Software verhindern; wir weisen Sie jedoch darauf hin, dass Sie in diesem Fall gegebenenfalls nicht sämtliche Funktionen dieser Website vollumfänglich werden nutzen können. Sie können darüber hinaus die Erfassung der durch das Cookie erzeugten und auf Ihre Nutzung der Website bezogenen Daten (inkl. Ihrer IPAdresse) an Google sowie die Verarbeitung dieser Daten durch Google verhindern, indem sie das unter dem folgenden Link verfügbare Browser-Plugin herunterladen und installieren http://tools.google.com/dlpage/gaoptout. Wenn Sie die Auswertung Ihrer demografischen Merkmale und Interessen anpassen oder verhindern möchten, können Sie Google Analytics für Display-Werbung deaktivieren und die Anzeigen im Google DisplayNetzwerk anpassen: https://www.google.com/settings/ads. Beim Aufruf dieser Website über ein mobiles Endgerät (Smartphone, Tablet o.ä.) können Sie der Nutzung Ihrer Daten durch Google durch das Anklicken eines gesonderten Links im angezeigten Dialogfeld widersprechen.
17. Social Media Plugins Facebook Auf unserer Website sind Verweise (Links) auf das externe soziale Netzwerk Facebook enthalten. Dieser Internetauftritt wird ausschließlich von der Facebook Inc., 1601 S. California Ave, Palo Alto, CA 94304, USA (Facebook) betrieben. Die Verweise sind im Rahmen unseres Internetauftritts durch das Facebook Logo oder den Zusatz „Gefällt mir” kenntlich gemacht (es werden keine Facebook-Plugins genutzt). Wird diesen Verweisen durch einen Klick gefolgt, werden die Facebook-Plugins aktiviert und Ihr Browser stellt eine direkte Verbindung mit den Servern von Facebook her. Sofern Sie während des Besuchs unserer Website den Verweisen folgen und über Ihr persönliches Benutzerkonto bei Facebook eingeloggt sind, wird die Information, dass Sie unsere Website besucht haben, an Facebook weitergeleitet. Den Besuch der Website kann Facebook ihrem Konto zuordnen.
Diese Informationen werden an Facebook übermittelt und dort gespeichert. Um dies zu verhindern müssen Sie sich vor dem Klick auf den Verweis aus Ihrem Facebook-Account ausloggen. Die den Verweisen von Facebook zugewiesenen Funktionen, insbesondere die Übermittlung von Informationen und Nutzerdaten, werden nicht bereits durch das Besuchen unserer Website aktiv, sondern erst durch den Klick auf die entsprechenden Verweise. Zweck und Umfang der Datenerhebung durch Facebook sowie die dortige weitere Verarbeitung und Nutzung Ihrer Daten wie auch Ihre diesbezüglichen Rechte und Einstellungsmöglichkeiten zum Schutz Ihrer Privatsphäre entnehmen Sie bitte den Datenschutzhinweisen von Facebook (http://de-de.facebook.com/privacy/explanation.php). Bei weiteren Fragen zur Erhebung, Verarbeitung oder Nutzung Ihrer personenbezogenen Daten sowie bei Auskünften, Berichtigung, Sperrung oder Löschung von Daten in diesem Bereich wenden Sie sich bitte an uns.
Facebook Connect Wir bieten Ihnen die Möglichkeit, sich für unsere Dienstleistungen mit Facebook Connect anzumelden. Hierzu werden Sie auf die Seite von Facebook weitergeleitet, wo Sie sich mit ihren Facebook-Nutzerdaten anmelden. Das Facebook-Profil wird dann mit unseren Dienstleistungen verknüpft. Durch die Verknüpfung werden – je nach Ihren FacebookEinstellungen – folgende Daten an uns übermittelt, bzw. von uns abgerufen: Name, Geburtsdatum sowie E-Mail-Adresse. Wir nutzen diese Daten ausschließlich zur Identifizierung und Vertragsabwicklung. Weitere Informationen zu Facebook Connect und den Privatsphäre-Einstellungen entnehmen Sie bitten den Datenschutzhinweisen und Nutzungsbedingungen der Facebook Inc.
18. Retargeting Diese Website verwendet ebenfalls Retargeting-Technologie, um auf Websites unserer Partner gezielt User mit Werbung anzusprechen, die sich bereits für unsere Produkte interessiert haben. Die Einblendung der Werbemittel erfolgt beim Retargeting auf der Basis eines Cookies, welcher gesetzt wird, wenn eine Produktseite aufgerufen wird. Selbstverständlich werden auch hierbei keine personenbezogenen Daten gespeichert und ebenso selbstverständlich erfolgt die Verwendung der Retargeting-Technologie unter Beachtung der geltenden gesetzlichen Datenschutzbestimmungen. Wenn Sie nicht möchten, dass Ihnen interessenbezogene Werbung angezeigt wird, können Sie Besucher die Verwendung von Cookies durch Google deaktivieren können, indem sie die Anzeigenvorgaben aufrufen. Alternativ können Ihre Besucher die Verwendung von Cookies durch Drittanbieter deaktivieren, indem sie die Deaktivierungsseite der Netzwerkwerbeinitiative aufrufen.
Diese Datenschutzerklärung wurde, bis auf die Absätze 16., 17, 18 und Ergänzungen inAbsatz 5 und 6., durch den Datenschutzerklärungs-Generator der DGD DeutscheGesellschaft für Datenschutz GmbH, die als Externer Datenschutzbeauftragter Dresden tätig ist, in Kooperation mit dem Rechtsanwalt für Datenschutzrecht Christian Solmecke erstellt. Stand der Datenschutzerklärung Mai 2018
Headline
Headline
Content
SYSTEM
ONLINELEAGUE.co.uk has been updated. The page will now be reloaded once so that all changes can take effect!
Matchday
MAP
News
STATISTICS
Do you want to install ONLINELEAGUE.co.uk as a webapp on your home screen?